KubeSphere
Upgrade - Overview
- Before you upgrade your cluster to KubeSphere 3.4, you need to have a KubeSphere cluster running v3.2.x.
- You can choose to only upgrade KubeSphere to 3.4 or upgrade Kubernetes (to a higher version) and KubeSphere (to 3.4) at the same time.
- For Kubernetes versions with an asterisk, some features of edge nodes may be unavailable due to incompatability. Therefore, if you want to use edge nodes, you are advised to install Kubernetes v1.23.x.
** before the upgrade:
- Implement a simulation in testing environment first. After upgrade successfully in testing environment, then upgrade your cluster in your production environment.
- Recommend to backup( can use Velero to backup & migrate kubernetes resources). **
There are 2 ways to upgrade Kubernetes.
1. Upgrade with KubeKey
- KubeKey is recommended for users whose KubeSphere and Kubernetes were both installed by KubeKey
+ Requirements
- your kubesphere cluster running v3.3.x. If it isnt, upgrade it.
- back up is important
+ Before upgrade, please note
-
Change of built-in roles: Platform-level built-in roles
users-managerandworkspace-managerare removed. If an existing user has been bound tousers-managerorworkspace-manager, its role will be changed toplatform-regularafter the upgrade is completed. Roleplatform-self-provisioneris added. For more information about built-in roles, refer to Create a user. -
Some permission of custom roles are removed:
- Removed permissions of platform-level custom roles: user management, role management, and workspace management.
- Removed permissions of workspace-level custom roles: user management, role management, and user group management.
- Removed permissions of namespace-level custom roles: user management and role management.
- After you upgrade KubeSphere to new version, custom roles will be retained, but removed permissions of the custom roles will be revoked.
+ Download Kubekey( command line or github https://github.com/kubesphere/kubekey/releases )
- cmd: curl -sfL https://get-kk.kubesphere.io | VERSION=version sh -
- Make
kkexecutable: chmod +x kk
- Make
+ Upgrade KubeSphere and Kubernetes
Upgrading steps are different for single-node clusters (all-in-one) and multi-node clusters.
-
- All-in-one cluster: upgrade single-node cluster to kubeShpere and Kubernetes
cmd: ./kk upgrade --with-kubernetes version --with-kubesphere version
-
- Multi-node cluster:
- Step1 : Generate a configuration file using KubeKey (cmd below use for creating a configuration file
sample.yamlof your cluster.)- cmd: ./kk create config --from-cluster
- Step2 : Edit the configuration file template ( Edit
sample.yamlbased on your cluster configuration )hosts: The basic information of your hosts (hostname and IP address) and how to connect to them using SSH.roleGroups.etcd: Your etcd nodes.controlPlaneEndpoint: Your load balancer address (optional).registry: Your image registry information (optional).
- Step3 : Upgrade the cluster
- cmd: ./kk upgrade --with-kubernetes version --with-kubesphere version -f sample.yaml
- cmd: ./kk upgrade --with-kubernetes version --with-kubesphere version -f sample.yaml
- Step1 : Generate a configuration file using KubeKey (cmd below use for creating a configuration file
- Multi-node cluster:
2. Upgrade with ks-installer
- ks-installer is recommended for users whose Kubernetes clusters were not set up by KubeKey, but hosted by cloud vendors or created by themselves.
+ Requirements
- your kubesphere cluster running v3.3.x. If it isnt, upgrade it.
- back up is important
+ Before upgrade, please note
-
Change of built-in roles: Platform-level built-in roles
users-managerandworkspace-managerare removed. If an existing user has been bound tousers-managerorworkspace-manager, its role will be changed toplatform-regularafter the upgrade is completed. Roleplatform-self-provisioneris added. For more information about built-in roles, refer to Create a user. -
Some permission of custom roles are removed:
- Removed permissions of platform-level custom roles: user management, role management, and workspace management.
- Removed permissions of workspace-level custom roles: user management, role management, and user group management.
- Removed permissions of namespace-level custom roles: user management and role management.
- After you upgrade KubeSphere to new version, custom roles will be retained, but removed permissions of the custom roles will be revoked.
+ Apply ks-installer: cmd to upgrade the cluster
- cmd: kubectl apply -f https://github.com/kubesphere/ks-installer/releases/download/v3.4.1/kubesphere-installer.yaml --force
Cluster Administrator
https://kubesphere.io/docs/v3.4/cluster-administration/
+ KubeSphere Log Dashboard
As an open-source, application-centric container platform, KubeSphere v3.4.1 uses OpenSearch instead of ElasticSearch as the backend storage for logs, events, and auditing. By default, we can use the query tool provided in the lower-right corner on the KubeSphere console to retrieve logs, events, and auditing records.
+ Enable Log Dashboard Before KubeSphere Installation
- Install on Linux
When installing KubeSphere with multiple nodes on Linux, you should create a configuration file that lists all KubeSphere components.
1. When you Install KubeSphere on Linux, create a file config-sample.yaml and change it by executing the following command:
cmd: vi config-sample.yaml
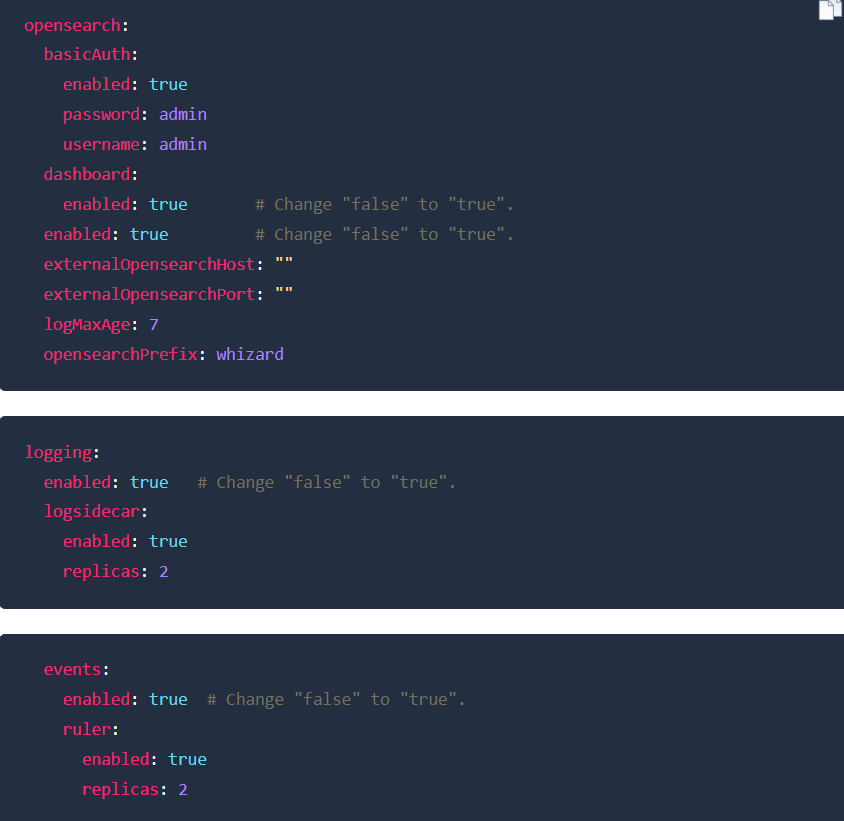
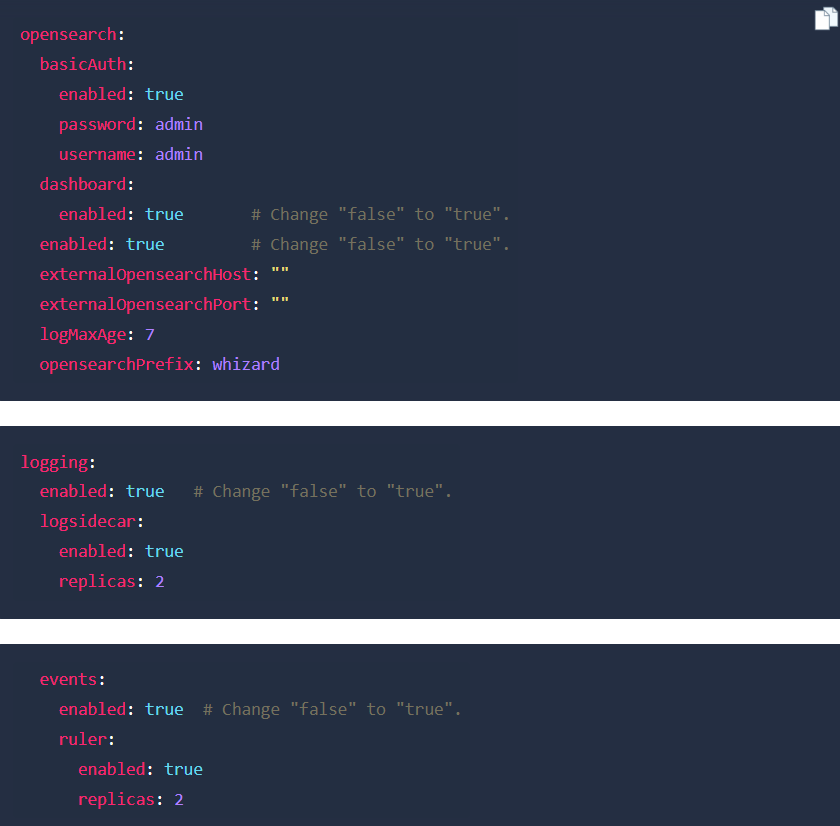
2. Before enabling the OpenSearch Dashboard, you need to enable components logging, opensearch, and events or auditing in the yaml file. In this example, enable events as follows:
3. Execute the following command to create the cluster using this configuration file:
cmd: ./kk create cluster -f config-sample.yaml
- Install on Kubernetes
When you Install KubeSphere on Kubernetes, you need to enable the relevant components in the cluster-configuration.yaml file.
1. Download the cluster-configuration.yaml file and edit the file using the following command:
cmd: vi cluster-configuration.yaml
2. Before enabling the OpenSearch Dashboard, you need to enable components logging, opensearch, and events or auditing in the yaml file. In this example, enable events as follows:
kubectl apply -f cluster-configuration.yaml
+ Enable Log Dashboard After KubeSphere Installation
-
Log in to the console as the
adminuser, click Platform in the upper left corner, and select Cluster Management. -
Click CRDs, enter
clusterconfigurationin the search bar, and click the search result to view its detailed page. - Under Custom Resources, click the three dots on the right side of
ks-installer, select Edit YAML. -
In the YAML file, edit as follows, and then click OK to save the configuration.
-
Check the installation process in kubectl by executing the following command:
cmd: kubectl logs -n kubesphere-system $(kubectl get pod -n kubesphere-system -l 'app in (ks-install, ks-installer)' -o jsonpath='{.items[0].metadata.name}') -f
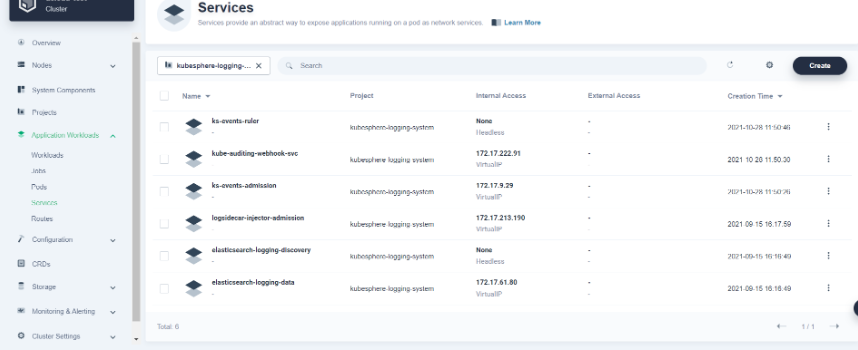
+ Access Log Dashboard
After logging in to the console, expose the 5601 port of the OpenSearch dashboard through NodePort or other forms such as Ingress to an accessible network as below:
+ Node Management